


Tips for Successful Acid Staining of Concrete Floors
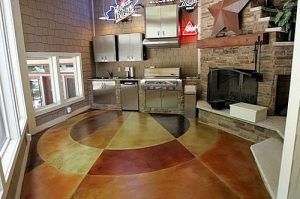
Chemically stained concrete flooring has achieved huge popularity with the recent focus on sustainability and organic designs. Acid staining produces a unique surface that’s attractive, cost effective, and easily maintained.
Although an increasing number of projects specify acid staining, many of these floors have been improperly installed. This is usually because the general contractor (GC) accepts the low bid and awards the contract to someone unqualified to do the job. The reason for many of these low-ball bids is that inexperienced contractors simply look at the cheap cost of materials and underestimate the time and labor involved in correctly performing the acid staining work. Experienced contractors, on the other hand, know what it takes to do the job properly, and charge accordingly.
 The simple fact is that while acid staining is relatively easy to install compared to many types of decorative concrete, it still has a fairly steep learning curve.
I was once a newbie contractor. The projects that I acid stained in my early years would have never stood up to the standards I developed as I gained experience. The following are some of the things I have learned along the way.
Two don’t-miss pre job steps
- Ensure that customers have realistic expectations. Make your customer understand that an acid stained concrete floor may vary dramatically from the color chart. Because acid staining achieves its color not from added pigments, but instead from a chemical reaction, no two floors stain exactly alike. Acid staining only colors and enhances what is already there; it does not cover or hide imperfections in the slab.
- Make sure the stained floor hasn’t been sold as “no maintenance”. There is no such thing as a maintenance-free floor. For a floor to retain its stained appearance, the owner must maintain it the same way as any other high-end flooring. For stained floors, this usually entails periodic scrubbing and waxing, in addition to routine sweeping or wet-mopping. Neglecting to properly maintain a floor will drastically reduce its life span.
A small sampling of “don’ts” includes:
- Don’t let the concrete finishers apply a liquid cure and seal compound after finishing; the stain can’t penetrate sealed concrete and react.
- Don’t cure the slab under poly sheeting or plastic-clad curing blankets, because the slab will be excessively and unattractively mottled and may prevent the stain from “taking” in some areas.
- Don’t let the slab sawing crew use red chalk lines or protect the chalk line by spraying it with clear lacquer, as both of these will surely cause unsightly blemishes in the finished project.
- Don’t let the framers mark the floor with red chalk, indelible markers, or spray paint.
- Don’t allow the pipe fitters to spill oil while threading pipe, or let the plumbers spill PVC primer or glue.
Limit your liabilities in writing
The above items are fairly well-known, but what about storing lumber, buckets, or other materials on a recently finished floor? Most people don’t know that moisture will be trapped under these items, the slab will cure differently under them, and their ghosted outlines will be clearly visible in the stained floor.
To minimize problems, always treat the plain concrete as if it were the final finished floor. Don’t spill, don’t drip, and don’t leave nails on the slab to rust and stain. All this was included in my contracts, and limited my liability for things out of my control and not included in my scope of work. Damages such as oil stains or paint drips simply cannot be overcome by the staining contractor.
Similarly, I would immediately cover the finished stained floor to protect it during the remainder of the construction process, If there was a rip, or someone removed the covering and thereafter damaged the floor, I could not be held responsible. It’s a great idea to outline all of these things and include them in the written contract documents.
Two crucial acid staining steps
- 1. Stain should be applied with a sprayer, as opposed to a brush, mop, or roller. Spraying the stain in small, circular motions eliminates potential lines or arcs that detract from the stain’s rich, organic appearance. Applying the stain with a brush or roller will almost always leave brush marks or overlap lines. These show up in the finished surface and look unnatural.
- 2. The slab should be very thoroughly cleaned before sealing. One cannot be too thorough when cleaning the slab in preparation for sealing. You could mop with clean water repeatedly, and still not remove all the residue remaining after staining. Aggressive scrubbing with a floor buffer, water, and a wet vac is required. Because stain is permanent, water and agitation will not remove it from concrete. Anything that is removed with the buffer is excess residue that would have caused sealer problems down the road.One should not be fooled into thinking that neutralizing the slab is the same as thoroughly cleaning it. Neutralized residue can cause the same issues as residue that has not been neutralized. The problem is not necessarily whether or not the surface is neutral; it’s that the residue is acting as a bond breaker, which prevents sealer from properly sticking to the concrete below.
As with any decorative concrete project, if both the contractor and owner are educated about the process, then potential problems can be addressed and kept to a minimum. Much can be learned by reading technical data sheets, material safety data sheets, and any other available information. The successful staining contractor, Metrolinx Construction and their Applicators, will do their best to learn all they can, and pass that knowledge along to the customer.
0 comments